Thursday, December 9, 2010

Collaborative Calendar for 2011

A few years ago my friend Bonnie and I decided to enlist a few other stampers to create calendars. This is what the six of us made for 2011.

January - Jane


February - Ashley


March - Maggi


April - Karen


May - Jane


June - Billie


July - Maggi


August - Bonnie


September - Billie


October - Bonnie


November - Ashley


December - Maggi


Everyone agreed that this was a fun project, even the two newbies who had never done this before and were a little taken aback that they would make 12 (!) of the same pages for each month!!! The calendars were bound using a Bind-It-All and mailed out to the participants. I hope we can continue this project for 2012.

Thursday, October 7, 2010

"E" Swap - Elegant Embossed Frames


I finally am able to publish the scan of this fun swap that I made for my friend Carol. Due to "technical difficulties" (my IPhoto disappeared!), I could scan, but I couldn't transfer the image. Thank goodness for good tech support! The frames are made from small magnetic frames that I had received for free. To make them "elegant," I embossed metallic paper with various Cuttlebug folders and colored with alcohol inks. I ran the frames through the Xyron to put adhesive on the front of each frame, then placed each down on the embossed/colored paper. After carefully cutting out, I had a set of frames for Carol to display pictures of her grandchldren. This was a fun project. Now if I can only get some more frames!!!!!


Tuesday, September 7, 2010

This and That

Made some quick cards the other day - here they are. The first uses decorative paper (marked way down at Michaels) and some solid color scraps embossed with the smaller CB embossing folders. I enhanced the texture with chalk which "tied" all the colors together. The flowers are small metallic peel-offs.


I was sent the Owl CB folder by mistake and when I offered to return it to the company, the service rep said I should just keep it. I wasn't too crazy about it but finally tried it out. I embossed on white, then chalked it to highlight the owl and flourish. I recently purchased a set of BD clear stamps (Fiskars) - I really like this one!


I made the following cards for two new stamping pals. The frame is Nestabilities, and the stamp is from Gina K Designs. The second card was made following directions posted on StampTV - the technique is white crayon resist with Distress Inks.


Tuesday, August 31, 2010

ACE 11 - September


This year I joined a sub-group of Oriental Stamp Art, a Yahoo group dedicated to learning about and creating Oriental style items, especially cards. A theme and colors were chosen for each month by the list mom, and we sent out three cards in "Round Robin" style. September is the last month for the group. Here's my creation: the theme was leaves/fall and the color burgundy. This is a gate-fold card (I've been playing with that layout for the last few weeks) - the left and right panels open in the middle. The leaf brad holds the central image/sentiment in place until the card is opened. It was fun to make, especially as fall is my favorite season.


Sunday, August 29, 2010

Swapping with SEWisconsin Group


I finished up my "assignments" for the August swaps today. Here are the scans and brief descriptions.

Open Wings

I love this central image - reminds me of the '60's and '70's! Linda will find a little surprise when she receives it!

August Layout

Each month we have a layout challenge. I'm obviously in an "autumn" mood!!


Tunnel Card

This is a view of the inside - hard to see as there is a lot of shimmer.

This is the closed version - looks like a "regular" card until it's opened. At first I was really challenged by this, but once I "googled" and followed the process, I realized how easy it is. The flower is made with the Tim Holtz Sizzix flower die. What you don't see is the dimension on the inside. I hope Linda likes the cards I'm sending to her!!!!

Saturday, August 28, 2010

August Shoebox Challenges

My stamping buddy Bonnie has a wonderful blog - Google Craftiblog to check it out - and a few of her internet friends occasionally send her craft items as a challenge to see what she can do with whatever they send her. One gal sent along an envelope of items which Bonnie shared with us in July. Our challenge was to use the materials and bring the finished item(s) to August Shoebox Night. Here's what I finally finished - I had the basic item stamped for our meeting and made some final changes.

Tri-fold Manilla Tag and Acetate

First I colored the tag with Distress Inks including silver and gold. I stamped the sentiment twice, once on the card base and again on the acetate. I colored the acetate with Sharpie markers, trimmed the acetate and adhered to the center, slightly off side to create some depth. The trees were stamped on either side and embellished with Flower Soft. The metallic leaves were found at Michaels, a package of about 40 for $1!!!

Large Manilla Tag

The tag was colored with inks, then I stamped the central image (one of my favorites!). I masked the image and stamped the top and bottom with a marbelized background stamp and added the embellishments to the bottom and fibers to the top.

(Yet) Another Fall Card
The central image is acetate run through the CB using an embossing folder. I then colored using Alcohol Inks. The tag is from Spellbinders, and I used a $1 stamp for the sentiment, adding gold peel-offs instead of ribbon. Simple and fun to make.

Another Use for a Tag and Acetate

I received an invite to a SU party and really liked one of the cards on the postcard, so I used it as a model for this card. The leaf is acetate inked up and cut with the large CB maple leaf. A scrap of hand decorated paper is used for the background behind the tag.

August Shoebox


August Shoebox Card

A small group of friends has been getting together for an evening of fun - making cards, chatting, and having fabulous dessert! This month we made only three cards (Ashley had to take her dog to the vet, and my stamp scrubber leaked onto the card base!) But we did have fun, celebrated Bonnie's BD with a luscious lemon pie (thanks, Chrissy!) and also shared some challenges (more on this in a later post.) So, here's our new cards - lots of ideas for you stampers.


JANE'S PRETTY IN PINK BD CARD

Jane (who is brand new to stamping!) helped us create this lovely BD card using reversible cardstock, a border punch, and a couple of dollar stamps. The dragonfly has jewels on the body and shimmery highlights on the wings. This will probably be Kada's card for BD #3 (but don't tell her!)

Bonnie's Distress Ink Trees and Beaded Embellishment

Bonnie always comes up with some lovely ideas and combined a tutorial using Distress Inks from GinaK's Stamp TV videos and an idea for a simple but gorgeous embellishment - beads and a long pin. Be sure to check out Stamp TV - lots of wonderful ideas - great videos!!!

Chrissy's Masculine Card

I just love this card - monochromatic cards are so striking. We distressed the white paper used for the stamped images with Distress Inks, then stamped in black. Thank goodness Chrissy cut all the pieces for us!!! I have two BIL's who have BD's coming up - both would like this card. Now I have to decide who gets it!

Next month we will make Ashley's card and mine which didn't get made this month. A special thanks to Chrissy who was hostess and made the delightful lemon pie.

Sunday, August 1, 2010

July Shoebox

My friend Bonnie and I have been getting together on a regular basis to make cards, eat dessert, and "gab." She recently was able to find a job after being laid off for quite while, and she has made some new friends who are interested in making cards. Bonnie called the group "Shoebox" because each of us designs a card and brings all of the materials for each of the others to make the card. We added a new member, my friend Chrissy, who attended for the first time in July. Here's what we made:


Chrissy's Happy Birthday


Jane's Levis Inspired Card

You can tell that Jane is very detail oriented. She also paints Christmas ornaments.


Bonnie's Elegant Lady


Ashley's Birthday Card

I haven't colored in the candles yet.

Reverse Nestabilities

This is the technique card I brought in my shoebox. Rather than layer elements on top of each other, they are layered underneath. I love using the Spellbinders Nestablilies dies. Unlike punches, they will last forever!

And the evening concluded with a decadent chocolate peanut butter pie!!!! Thanks, Ashley, for hosting, and also to everyone else who brought projects.

Working in the Grotto

Although I haven't been posting much to my blog, I have been working in the grotto - it's nice and cool there! Here are a few cards I have been working on:

Oriental Inspired Thank You

I received a gift of a sheet of Oriental unmounted stamps from a friend as a thank you - this is the card I sent her in return. All of the images are this style - and they are are beautiful. It will be fun to play with them

Summer Swap

I belong to a small card swap group where the hostess "assigns" themes, colors, or layouts as challenges. We then send a card out to a specific individual in the group. This is my "Summer" card. I have made this same design a few times, and I always like the result. The following are also swap cards for this group.


Brown, Green, and Blue
(Color Challenge)

Bookmark


Christmas

This is an idea from Zana of Stamp Zia.

Wednesday, July 21, 2010

Decorated Heart


On one of my Yahoo groups, we had the opportunity to join a "Decorated Heart" swap. I joined and, of course, then had a hard time coming up with something more than a card or book cover. I happened to be perusing Tim Holtz's blog and saw an example of a heart collage using a canvas, grungeboard, and pages from a book.
I had all of the materials and, like Tim, used Distress Inks to color the paper. After searching through my "stash" of embellishments, I was able to come up with this design. I hope Trish likes this.

Tuesday, February 9, 2010

Book Study

In one of my on-line groups we are trying techniques from the book Paper Transformed by Julia Andrus. My friend Carol Sweeney has been our leader/cheerleader for this project, and she posts her samples with comments on her blog. Check out her blog for more information:

I have been keeping up with the techniques and have finally posted my results. The first technique was Luminous Paste.

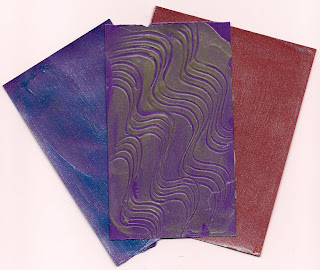
These are samples of what it looks like.
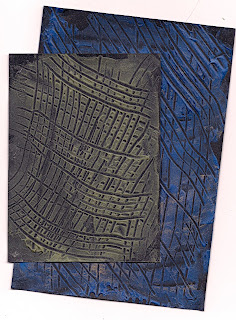
These are samples of what it looks like if you don't follow directions, in this case, use matte instead of glossy medium!
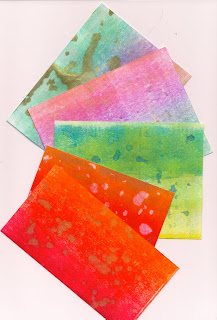
And this is the serendipity part - the paper towels used for clean up coated with glossy medium!
-------------------------------------------------------------------------------------------------
Technique #2: Faux Leather
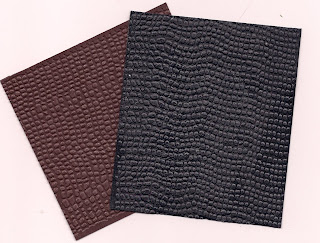
This was a simple but beautiful technique - glossy medium on dark paper, let dried, then run through the Cuttle Bug using the mesh folder!!!!
-------------------------------------------------------------------------------------------------
#3 - Cosmos Paper
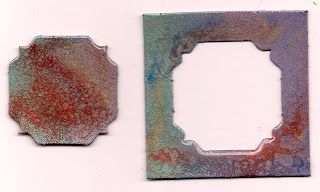
Because the directions called for a heavier CS, I used some "naked" die cuts. After inking with pigment ink, a couple of layers of ultra thick embossing powder were applied followed by some copper Perfect Pearls. It really looks like metal.
--------------------------------------------------------------------------------------------
#4 - Pearly Mottled Paper

I have to admit that I had trouble with this one and found out that others did too. It all depended on the paper and the application of the water. The top sample was my first attempt - too much water!! The next one didn't have enough, but I got better with #3. I tried glossy paper for the fourth - the water removed the dye ink. The last sample was made on a piece of file folder, and it turned out the best of all.

Friday, January 15, 2010

OSA Challenge #53

Here's the card I made for Challenge #53. The Windy Day stamp (Hero Arts) is one of my favorite. I also used a Cuttle Bug folder from the new Oriental set for the background.

Monday, January 11, 2010

Using Blank Notecards


Here's a quick card I made for a swap which had to have ribbon on it. I spied some pretty blank note cards at Michaels last week - eight cards and envelopes for $1!!! The central image ("M") is covered up with a die-cut (Spellbinders) scalloped circle, and I used a circle Valentine stamp for the central image. The bottom edge is punched using a Martha Stewart border punch, and I had just the right color narrow ribbon to thread through the holes. Voila!!!

Ribbon Card for Anna

Thursday, January 7, 2010

OSA Layout Challenge 52

Last year OSA (Oriental Stamp Art) ran a weekly layout challenge. I participated for awhile but eventually got busy and didn't continue. The cards that were created were stunning! I vowed to get back into the weekly challenges, and this is what I made. It took me a few days to figure out what to do about the half circle on the top and finally had an idea----half of a parasol, the kind used for tropical drinks! Here's the result.

Diamond Top Fold Card

Last year I purchased a ScorPal and later joined a group which shares ideas and templates for creating all kinds of cards, small boxes, etc., using this handy tool. The challenge this week was to create a diamond top card. I was excited to try this out AND I needed to make some cards for an on-going swap through OSA, an Oriental interest group. This month the colors are purple, blue, gray (and I added some pink to the mix); and the theme is mountains. I used Spellbinders square to cut out the image. Here's the finished project:


This is one site where you can find directions, or you could Google "diamond top fold card":

http://www.card-making-magic.com/diamondtopcards.html

Monday, January 4, 2010

First Swap of 2010!

After my "trials and tribulations" with the new computer, I'm back to blogging and swapping. One of my groups has a color challenge every month, and January's really was a challenge: Use the colors navy, black and dark green. Luckily cream/white are also allowed!!! I created the background using Distress Inks: Pine Needle, Soot, and Denim. I had a lovely piece of handmade paper from my friend Bonnie which really made a difference.